Monday, March 30, 2015

#TheHomeImprovementLife: Paint!

So now that we have all the popcorn off the walls, we now get to the fun part...paint! I have always loved painting, but it's such a small portion of what you actually do when you paint a room. 20% is painting, 80% is prepping the wall to paint!

First thing I had to do is sand down the joint areas on the ceiling and make sure there weren't any rough spots. I bought a handy dandy sanding block that you can put on a stick! Yay for no more reaching on ladders!

Love my new drywall ceiling sander!
Next thing I had to do was prime the ceiling. I have liked Kilz for priming, especially for ceilings. I remember going to a home improvement "expo" and seeing the difference helping the paint job last. Plus it just covers well! 
Add caption
Then, came the hour of removing any grit from drywall and plaster dust and taping the room off. So tedious...but so important! 
All taped off!
Now we get to paint! Again, love my roller on a stick so I can actually reach! 

Painting the ceiling!
I let the ceiling dry overnight and spent the next day taping and painting the rest of the walls!


Cutting in!

You can see how it goes on vs how it dries in this pic!
You can get a lot of really good tips on painting techniques online or even at Home Depot/Lowes. I've been doing it with my mom so long I have developed a method that works for me. Just know that quality of paint does matter in the amount of work you have to do, and be sure to use good natural light so that you can see any spots you miss. This is really important on textured walls like we have!

Monday, March 23, 2015

#TheHomeImprovementLife: Taking Off The Popcorn

So, we talked about project management (booooorring, but necessary). Let's get our hands dirty now!

Here are my before pictures!

As you enter the room
Far side wall

Turning right...

Turning right again...

Turning right again...

So when you scrape popcorn off the ceiling, it's important to note that you don't want to do this yourself is your house is older. I think cerca the 70's but don't quote me on that. Reason is, you may have asbestos in your popcorn ceiling insulation! Bad news! My house was built in the 2000's so I didn't have to worry about that.

Also thing to note is it is SO much easier to do this when you have gotten the popcorn wet first. Cuts down on the dust and makes it come off so much easier! I used an $8.00, one gallon sprayer you would see a pest guy use or to use to spray weeds. Just fill it with water, pump and spray! You will need to also prep your area by taping off the walls and floors and putting plastic to cover everything...this is extremely messy and hard to vacuum up! Finally, grab your ladder and dry wall scraper, along with your goggles and face mask!

Once you have the room prepped, it's really pretty simple. Spray a section at a time (I did approximately 10 ft by 10 ft) and wait for it to soak in (this is important! Gotta let it get all the way through)! Then, climb up on your ladder and start scraping. It's best if you have a 45 degree angle between the scraper and the ceiling.
Half way there!
Notice how I have taped the plastic as high up above the walls as I can!

This room only took an hour to do as it's only 100 square feet, but I can see why many people would want a contractor to come do it. My shoulders were pretty sore after and I was pretty messy! But once we were done we carefully balled all the plaster in the middle of the plastic and threw it away!

Finally done!


Completely covered in plaster


Tomorrow I'm painting the ceiling. Gotta cover up the now bare dry wall! Yay!

Friday, March 20, 2015

#TheHomeImprovementLife: Project Management

Hello again! Hope everyone is doing great. Jared and I had a great weekend where we went to Houston for some work training for me and time with family. One thing we realized while down there, is we are going to have a ton of guest coming to our house soon...and no place for them to sleep! We decided then to take a small amount of the bonus that Jared got from work last year and use it to remodel our guest room so we can host our guests comfortably!

So, I'm weird. And between me and Jared, we communicate weird on projects. I like writing things out so that I can realistically see how things can be done. Jared likes to see my designs on paper so he understands what I'm wanting (smart man)! So, what I wanted to share on the blog today is how I make a project management spreadsheet. My hope is it helps you plan your next home improvement project!

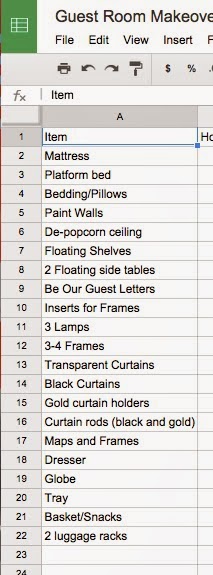
First, I draw out what I want things to look like. Then, from those drawings, I write down all the projects that I see in my drawing and list them in the spreadsheet. I like to use Google Docs so that Jared and see the spreadsheet too.


From there, I make a tab for each of the projects:

After I select the tab and write down the steps I would need to do to complete each project, and approximate the amount of time each needs to take. I don't try to be exact, but to just have a realistic expectation that things might take longer than I'd like.


Then I have the spreadsheet link each of these total times to the first tab with my list of all projects. I then assign a priority to each project, keeping in mind that if I start one project (like the curtains) getting the curtain rods and curtain holders would be the same priority.


Then we sort by priority and longest amount of hours and we now have a great visual on which projects we should start first!

Jared is on the project of building the platform bed and I'm on painting the room. Next time, I'll show you how we de-popcorned the ceiling!


Saturday, March 14, 2015

How I Made my E-Scrapbook: Part 2

Last time on the blog I introduced iBooks Author and some of the fun features you can use! Today, I want to walk you through the process I actually used to create my book!

I organized all my photos and videos. I use Dropbox, CapsuleCam, Photopass and my camera to take photos. Gathering and sorting these photos is a project in itself but so important! I label the folder that everything is gathered to "Originals" and then copy it to another folder labeled "Modified." That way, if a file gets corrupted, I have the original files still that I can copy over again and work with! Then each event or area that a photo or video can get organized into has it's own folder with a number in front of it that helps tell me what order the event is when I make it into the book. Sometimes, I'll create a big folder like "Magic Kingdom" with subfolders that hold photos from specific rides. These subfolders are also organized into chronological order with a number in the front.

All organized!
Then, I go into each folder and see if there are any videos. If there are, I import them into iMovie and stitch them together to make one video per page.

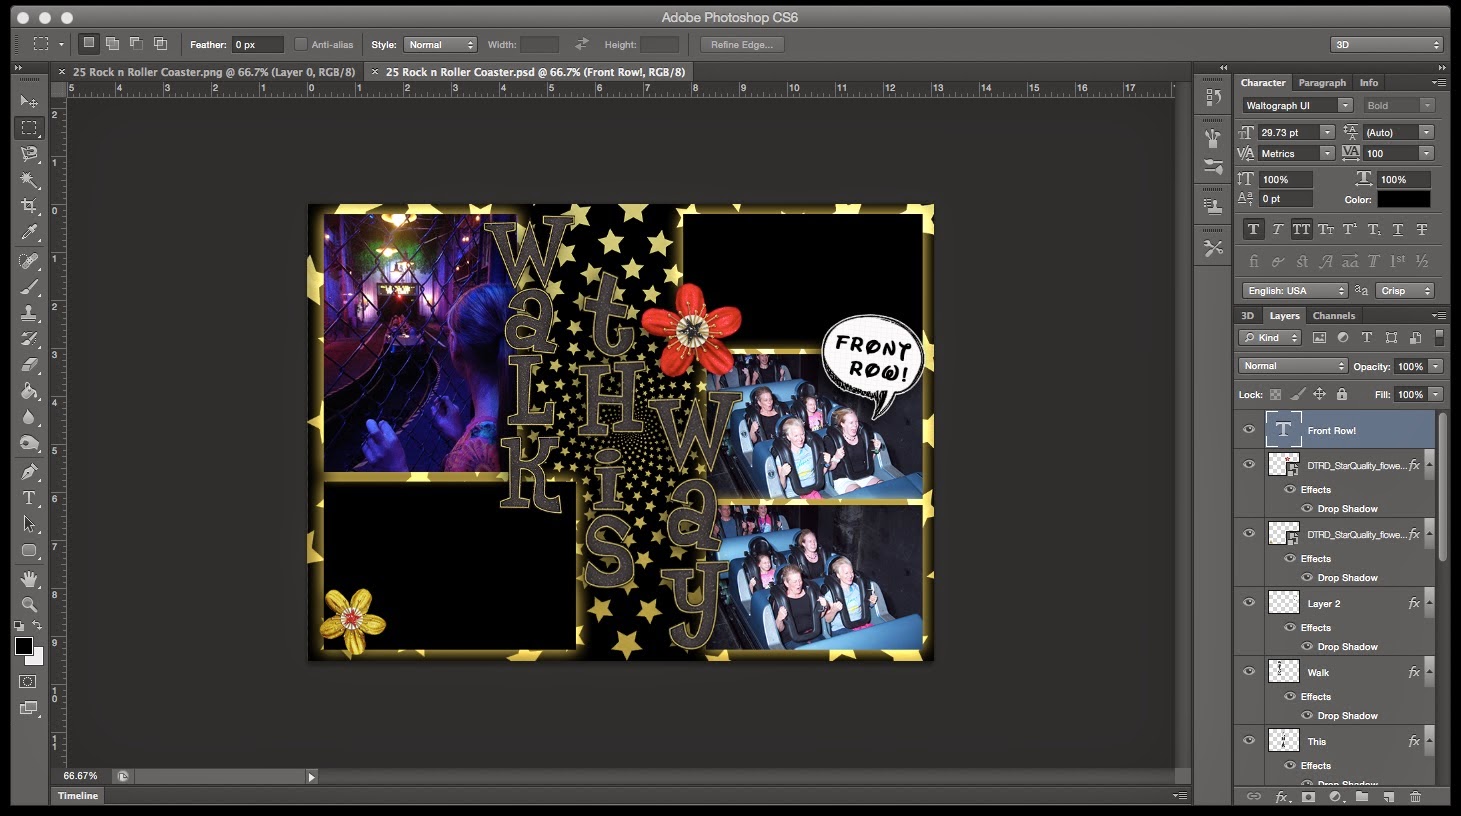
From there, I go into Photoshop and create my layout. I used the Grab software to "take a picture" of the iBook shape and size to make sure I knew my layout would fit. If you would like to know more about how to scrapbook using Photoshop, head over to the Daily Digi where they have great tutorials and supplies! I made sure to also take a photo of the shape and size of the video template to make sure I left a big enough "hole" for the video to show through on the page.

The Photoshop file is complete!

Once my layout was as I liked, I made sure to save it as a photoshop file, but also save it as a PNG. Then, on the PNG file, I flattened everything from the "hole" needed down to the paper I used as the background. Then I cut that piece out to show the transparency behind the paper, thus creating the hole. I repeated this for any widgets I was going to add into the scrapbook later in iBooks Author.


We now have a PNG file ready to be imported!

Once the PNG was created, I added it to iBooks on the appropriate page (I label all my files with the number page followed by the title of the page) and then added in my widgets. I would set all widget layouts to not include any margins or background titles and then set all the widgets to behind the PNG file on the page. Sometimes, I would realize I needed to change something in my PNG for the widget layout to work. That's why it's important to keep the Photoshop file. That's what I opened to make changes and to overwrite the corrected PNG for the book!

The widgets are inserted and formatted, just need to be placed behind the PNG file!
I repeated this process for all the pages. Then you can go in and create your intro media and table of contents. Don't forget about making a cute cover!

From here you can publish to the iBooks Store if you would like. If your like me and only want it for personal use on your iPad, you can export it as an iBooks file and import it into your iBooks for viewing enjoyment!

The exciting part of this technology is that there are already so many apps being written to add to iBooks Author. Check this out and see what you can add to your next book! Your imagination is the only thing limiting the awesomeness of your E-Scrapbook!

If you have any questions for me about how I created my book, feel free to email me and ask!

Thursday, March 12, 2015

How I Made My E-Scrapbook: Part 1

Enjoying my latest scrapbook on the iPad mini with some coffee!

So last post I wrote about how I came about deciding to make my E-scrapbook for our most recent Disney trip. If your curious how I got to this point, you can check out the post here.

So how did I make it?

First off, I had to do some research. I knew there had to be some sort of software out there to do it, question was, how much? Not five minutes later did I find a post through my Google search talking about iBooks Author. Not only did it create some fun ebooks, it was free! Amazing!

After downloading, I found a Youtube on how to use it! Check this small tutorial out!


The widgets are awesome and really sent my creativity into overdrive. In order to create them, I had to make my layouts that I created in Photoshop PNG files, with appropriate "holes" to allow the widgets to show. Then, when I inserted the PNG files into the book page, I would send all my widgets to the back of the page so that they were nice and framed by my layout. However, I learned a few things about what I needed to do in Photoshop to make my layout designs work:
  1. Many times, the widgets are not able to be rotated. This threw my normal "off-kilter" style of scrapbooking for a loop. I like things to almost resemble a smash book on some pages, but I couldn't do that if I wanted my widgets to match the holes made for them in my PNG files. 
  2. I couldn't use the gallery widget and keep them behind the PNG files. This would cause a ton of my decorations from my digital scrapbooking to be covered up. I solved this by creating Keynote slideshows of my photos and inserting the keynotes into the page. It's an additional step, but looks much better!
  3. If you want journaling cards behind scrolling widgets, you can set the opacity of the fill to 0% to allow for that to show through. Just be sure to set the line stroke to "no line" so you don't have a weird line around your text!
  4. If you want to have a pop-over text box, you need to have the photo inserted in the page via iBooks Author. This makes design a challenge as you need to make sure the widget from one photo isn't bleeding over into the hole of another widget. Frames became my friend to hide these overlaps!
  5. If you wanted to actually publish your book to iBooks (I didn't want to) you need to keep it below 2G of file size. This is important to keep in mind as you insert videos and media!
Next time on the blog, I'll walk you through my work flow of how I created the book!

Tuesday, March 10, 2015

Disney Scrapbook...electronic version?

We got the amazing opportunity to run the Disney Princess Half Marathon weekend a couple weekends ago. I'm not going to go into a full trip report as you can probably jump on Pinterest or any of the Disney podcasts I referred to last week and get them from there. What I can say is that it was an amazing trip. Most people might be a bit weirded out to have a trip with your in-laws, but my mom, my mother-in-law, my sister-in-law and myself all had a blast! We got to stay in our home DVC resort, the Grand Floridian. The room was spectacular and we loved the hotel amenities. Being able to eat a fantastic dinner right on property the day we arrived was perfect. Plus, we took full advantage of the monorail to get to the races. I definitely think it's the way to go!

All of us were admiring the chocolate sculpture at Narcoosse's

The weekend in the parks was amazing too. I finally figured out the Fastpass + system (it was still in testing phase last time we visited) and we had a great time riding our favorite rides and going to EPCOT at nights before our dining reservations. I got high praise from my family on the dinners. Those ADRs are super important people! 

My little sister-in-law loved sitting next to the fish during dinner at the Coral Reef Restaurant.

The best thing about this weekend was being able to run. I was so careful on this training cycle to make sure I didn't get injured...a feat the ice in Dallas made difficult! But to share a special moment with my in-laws as they crossed the finish line of their first 10K, knowing how hard they trained, was super special. Then, while my mom and I have always shared a special bond, running has taken it to a whole different world. Yet, ever since we both fell in love with racing, we hadn't actually run a race together. Mom is always so much faster than me and I have frequently had Jared to run with on Disney races as we also train together (it's just natural I guess). So this race weekend, I made it a goal to keep up with my mom...and I did! Thank goodness she slowed down (just a little bit!) as we had a really special 13.1 miles to share and encourage each other on. 

Mom and I at the finish of the Half Marathon after receiving our Glass Slipper Challenge Medals!

Ironically, it was racing with my mom that caused me to have my brilliant idea. 

If you travel with me, you are probably going to have to deal with me breaking out the camera and the GoPro. I have made a scrapbook for every year Jared and I have been together. First, I stared cutting out photos and pasting them into a small book with a few paper embellishments. To a certain extent, I enjoy that form of scrapbooking. But then, I was introduced to digital scrapbooking and it has transformed my methods for documenting our memories. I learned how to scan and photoshop and love the layouts I have been able to create. But there were still a couple of hurdles I was working on overcoming. 
  1. These books are expensive! Even with me uploading my layouts and waiting for a Shutterfly sale, these books can get out of my price range. 
  2. All my GoPro videos were having to be incorporated into my layouts via QR codes. Now, I need to have the scrapbook and an iPad to see everything. 
With all the special moments during our vacation, I really wanted to find a way to incorporate EVERYTHING. Mom and I were discussing during the race how much video was now being added to our memory maker packages and not just photos (we had video from rides and animated characters in our magic shots). I was lamenting that I wasn't going to have as many photos and how awesome it would be to incorporate videos on my page. 

Lightbulb moment!

I remembered how in my playbook for the Daily Digi Files (where I get my digital scrapbooking supplies) they have videos incorporated at the end of the book. What if there was a way to make these scrapbooks and just have an iPad to view them?

So, after two weeks of research and work, I have finished my first ever e-scrapbook! It documents all we did over the weekend in almost 40 pages of photos and videos. I have uploaded a sample of it (not the whole book) for you to check out if you would like. It's an iBook file so you will need to have iBooks to check it out. Over the next few blog posts, I'll explain how I created it!

Wednesday, March 4, 2015

Running Your Mind While Your Body Is Running


When I was training for my marathon, I learned very quickly that this meant LONG hours out on the trails and roads. For me, I love music. It makes my heart jump for joy with the right song and chills me out when I start getting stressed. But any playlist, when it goes for hours on end, can get a bit monotonous. When I couldn't find enough songs that made the long hours of running bearable, that's when I found podcasts!

What made me fall in love with podcasts is the part of my personality that constantly loves to learn. Thing is, I don't have time to sit down and read up on all the latest news as I am usually constantly on the move. Then I found out that many of my favorite pastors put their sermons online in the form of a podcast. As I started listening to these, I actually began to crave the long runs so that I could listen to them. By the time I was done with my runs, it wasn't my body that was just feeling refreshed, but my mind and spirit.

Since then, I have started listening to podcasts all the time. I listen to them while I drive, clean, craft, cook, garden, and of course, run! My repertoire of what I listen to while I work has expanded dramatically too. So here's my favorite podcasts and the links so that you can listen to them too!

The Mark Davis Show - a local news talk show. It helps me keep up with the news and issues being discussed in my community!

The Glenn Beck Program - Highly entertaining as it is informational, I enjoy listening to them talk about national issues. I consider it my American duty to keep up with what is going on and be an informed voter!

The Survival Podcast - not only does it talk about good things to be prepared for like ice storms and blackouts,  but it also talks a ton about gardening and permaculture. I learn something every time I listen!

Stuff You Should Know - Purely educational, they bring a different topic to each show and discuss what it is, history behind it and if applicable, the science behind it! They talk about everything from pirates to muppets. You will definitely learn!

Harvest Eating Podcast - Chef Snow talks about how to cook locally and seasonally on this podcast. He doesn't just give recipes, but teaching cooking techniques too!

Brant and Sherri Podcast - by far my favorite of them all. Brant used to be a DJ on a radio station we listen to and his quirky and fun insights into Christianity and the love God has for us always makes the runs I have more awesome!

The Pocket Lenses Podcast - This podcast is awesome as it teaches how to take great photos without the ginormous DSLR cameras people have. From point and shoot to cell phones, my photography has already improved!

PodCacher Podcast - When it comes to geocaching, this is the place to get your news, tips and tricks and fun interviews with other podcachers! Always love their weekly shows!

The Gun Show Podcast - I love this podcast as they don't worry about being "polished" and "radio professional" and just tell it like it is. From training to new guns to news, this is the place I love to listen and learn from!

Breakaway Ministries - Jared and I were shaped by this on-campus bible study while attending Texas A&M University and it is awesome that technology allows us to still listen today. I always learn and grow spiritually while listening to Ben Stewart or any of the guest speakers!

The Mickey Miles Podcast - How can I be a Disney runner and not listen to a Disney running podcast?? This podcast is awesome as they answer listener questions and discuss events and news in the world of RunDisney.

The WDW Radio Podcast - This is the podcast that makes me the happiest on my runs. While I'm digging deep in mile 9 of my run, Lou Mongello is describing and talking about anything and everything Disney. Makes the times I'm not at my second home much more bearable!

Whew! What a list! I hope there is something for everyone on this list that you can add to your podcast repertoire. Now excuse me while I go listen to one as I vacuum the house!

Monday, March 2, 2015

New Adventures!

Jared and I have some exciting news to announce. No, it is not a baby (Courtney! Haha.) but we are embarking on a journey of faith to minister to those enslaved in human trafficking! We have been called by God to work with Redeemed Ministries full time.

Redeemed started in 2005 just simply reaching out to women who were trapped in sex trafficking and showing them the unconditional love Jesus shows us. Many times, these women come from very broken homes. 90% of girls trapped in sex trafficking have been abused sexually as children. They never learn that behavior is not normal. Pimps then exploit that past to take advantage of these girls and the cycle is brutal and often fatal. While these women are forced to serve up to 30 men in a day, they often turn to drugs to cope and/or also get beat by their pimps to make sure they obey whatever the pimp tells them to do. 

While many ministries go out to the brothels with the intent on “extracting” girls from their situation, we simply go in to offer the love of Jesus to them. Many times these girls are in denial that they are in a dangerous place and until they realize that, even if we “extracted” them from their situation, no change would take place. When they would leave our care, they would go right back to what they were doing. We believe by going in and just ministering and sharing love with them allows God seeds to be planted in their life to realize they are loved, but not by their pimps. This process of change allows them to be an active participant in their life change. Then, if they want to leave the life, we can help provide them a safe place, in the form of a safe house, to get away from their pimp AND increase their chance of not going back. Jesus is the one working on the inside to heal and change their hearts. We are simply servants to help provide the environment for that change and the voice of reasoning when the tough times come. 

That brings me to one of the most exciting parts of Redeemed, our aftercare program! We have a safe house out in the country where we can house girls for a year long program. We have partnered with Rutgers University to develop a program that specifically helps heal trauma associated with trafficking and we have seen God use that tremendously! Just in the last year we have seen two women baptized and graduated. One is even entering the missionary field and ministering to others. It’s the most amazing thing to watch God completely transform the lives of these women who were so broken and now they flourish in the love God has for us! We are working to build a new, larger safe house so that we can minister to even more women. 

I first heard about human trafficking in my car (go figure!). I was working at a winery as a part of my research project in college and the drive was an hour one way. I listened to podcasts by Christine Caine while I drove. She runs a global anti-human trafficking organization called A21 and hearing about it tugged at my heartstrings like nothing had ever done before. The thing I most identified with was the fact that the fear these women have for their pimps paralyzes them from trying to find any other alternative to their situation. This fear allows them to be abused over and over again. I have battled with similar fear in my life and sitting there in the car, I wanted to reach through my stereo to the women and tell them they didn’t have to be governed by fear anymore. However, I was in College Station, TX…not Athens, Greece. Nor did I ever see God sending me to where A21 was going. 

Fast forward to me getting married and moving to Houston. My husband and I were looking for a church. We visited one down the road one Sunday and the topic was human trafficking in Houston with the featured ministry being Redeemed. I found out that between Dallas, Austin and Houston, 25% of girls trafficked found themselves in Texas at some point. I instantly knew I was supposed to be involved. I have since volunteered with them over the last three years and have never looked back!

I’ve had the opportunity to mentor girls, work on the social media team, help market the ministry and teach others about trafficking. Honestly, it has been the biggest and most fulfilling thing in my life. I learned so much about myself and about trafficking and I was given the opportunity to bring it with me when my husband and I moved to Dallas. As I look at 2015 and really start to build the ground work for what we are doing, I am so excited for what I believe God will do in Dallas. 

One thing that has been a bittersweet point in this transition is that my position has been a volunteer position for so long. But the ministry is growing to the point where I cannot hold my current position as a Children’s Pastor and do Redeemed at the level of excellence both ministries deserve. I’m truly sad to leave the amazing community God has allowed me to be a part of. Yet, God has already been faithful by providing not only a new community, but financial funding through monthly donations.

This is where you can get involved! While I will receive a small stipend from Redeemed it is not enough to cover expenses Jared and I have, even with his job. If you heard my story and my heart for this ministry and would be willing to support me monthly, please take a few minutes to sign up and pledge to fund this ministry Jared and I will be building. This is a direct way you can help...by giving me the financial funding for me to work towards helping these women full time! It will have a huge impact for us, and for allowing us to advance the kingdom of God!

Ultimately, we see ourselves as an extension of the church; where we are bringing the gospel to some of the deepest and darkest of places and hopefully, seeing God transform the lives of those we meet. Jesus said he didn’t come for the well, but for the sick. From the women that are enslaved, to the pimps that do the enslaving and the men who buy, the people are plenty for God to reach and the gospel is so desperately needed on all fronts of this situation.

Thank you all for supporting us, whether that be through prayer or by financially supporting us. We are so grateful for all of our community. Here's to what God has in store!