Showing posts with label Memory Keeping. Show all posts

Saturday, March 14, 2015

How I Made my E-Scrapbook: Part 2

Last time on the blog I introduced iBooks Author and some of the fun features you can use! Today, I want to walk you through the process I actually used to create my book!

I organized all my photos and videos. I use Dropbox, CapsuleCam, Photopass and my camera to take photos. Gathering and sorting these photos is a project in itself but so important! I label the folder that everything is gathered to "Originals" and then copy it to another folder labeled "Modified." That way, if a file gets corrupted, I have the original files still that I can copy over again and work with! Then each event or area that a photo or video can get organized into has it's own folder with a number in front of it that helps tell me what order the event is when I make it into the book. Sometimes, I'll create a big folder like "Magic Kingdom" with subfolders that hold photos from specific rides. These subfolders are also organized into chronological order with a number in the front.

All organized!
Then, I go into each folder and see if there are any videos. If there are, I import them into iMovie and stitch them together to make one video per page.

From there, I go into Photoshop and create my layout. I used the Grab software to "take a picture" of the iBook shape and size to make sure I knew my layout would fit. If you would like to know more about how to scrapbook using Photoshop, head over to the Daily Digi where they have great tutorials and supplies! I made sure to also take a photo of the shape and size of the video template to make sure I left a big enough "hole" for the video to show through on the page.
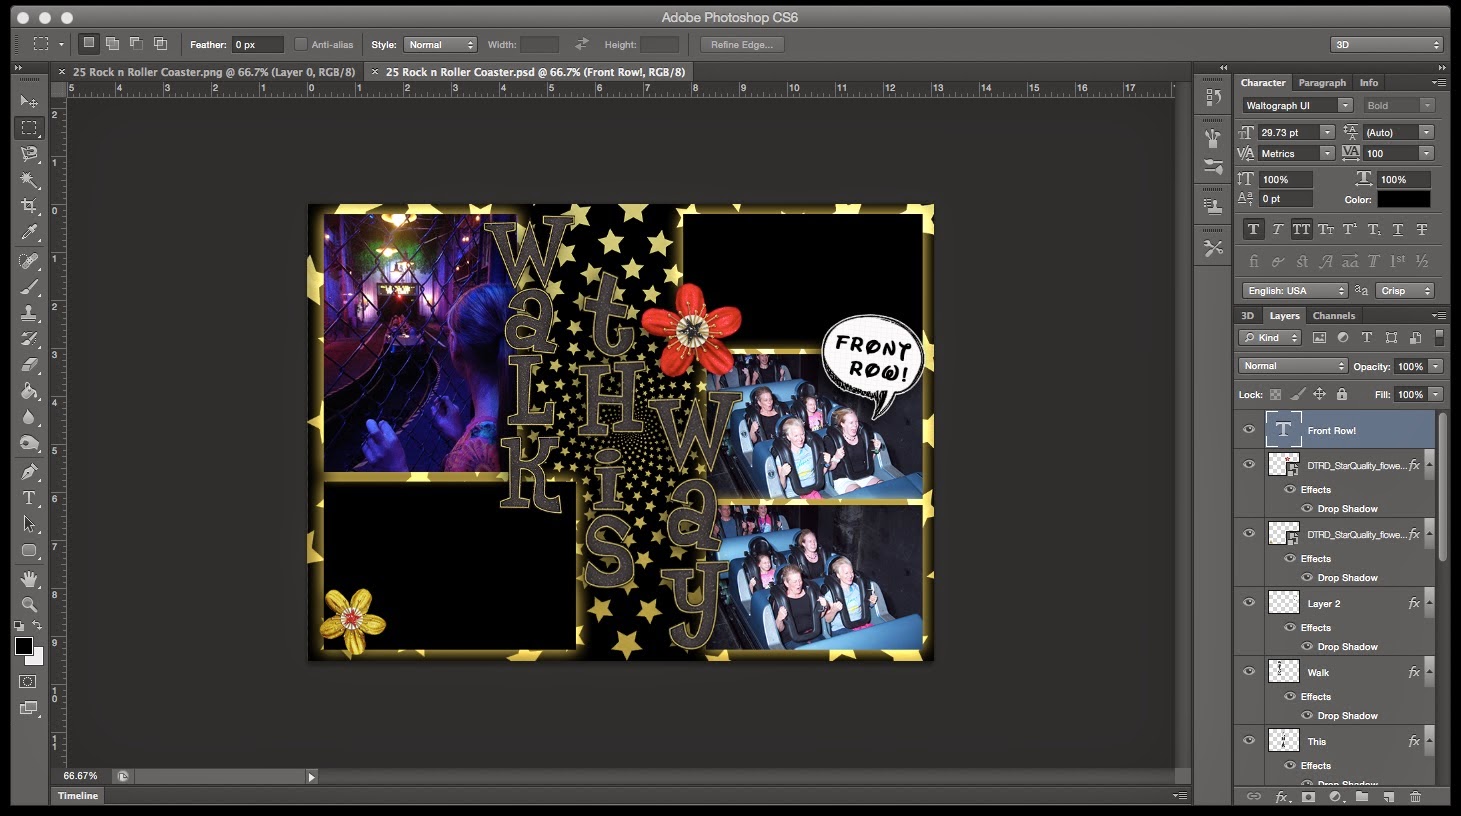
The Photoshop file is complete!

Once my layout was as I liked, I made sure to save it as a photoshop file, but also save it as a PNG. Then, on the PNG file, I flattened everything from the "hole" needed down to the paper I used as the background. Then I cut that piece out to show the transparency behind the paper, thus creating the hole. I repeated this for any widgets I was going to add into the scrapbook later in iBooks Author.


We now have a PNG file ready to be imported!

Once the PNG was created, I added it to iBooks on the appropriate page (I label all my files with the number page followed by the title of the page) and then added in my widgets. I would set all widget layouts to not include any margins or background titles and then set all the widgets to behind the PNG file on the page. Sometimes, I would realize I needed to change something in my PNG for the widget layout to work. That's why it's important to keep the Photoshop file. That's what I opened to make changes and to overwrite the corrected PNG for the book!

The widgets are inserted and formatted, just need to be placed behind the PNG file!
I repeated this process for all the pages. Then you can go in and create your intro media and table of contents. Don't forget about making a cute cover!

From here you can publish to the iBooks Store if you would like. If your like me and only want it for personal use on your iPad, you can export it as an iBooks file and import it into your iBooks for viewing enjoyment!

The exciting part of this technology is that there are already so many apps being written to add to iBooks Author. Check this out and see what you can add to your next book! Your imagination is the only thing limiting the awesomeness of your E-Scrapbook!

If you have any questions for me about how I created my book, feel free to email me and ask!

Thursday, March 12, 2015

How I Made My E-Scrapbook: Part 1

Enjoying my latest scrapbook on the iPad mini with some coffee!

So last post I wrote about how I came about deciding to make my E-scrapbook for our most recent Disney trip. If your curious how I got to this point, you can check out the post here.

So how did I make it?

First off, I had to do some research. I knew there had to be some sort of software out there to do it, question was, how much? Not five minutes later did I find a post through my Google search talking about iBooks Author. Not only did it create some fun ebooks, it was free! Amazing!

After downloading, I found a Youtube on how to use it! Check this small tutorial out!


The widgets are awesome and really sent my creativity into overdrive. In order to create them, I had to make my layouts that I created in Photoshop PNG files, with appropriate "holes" to allow the widgets to show. Then, when I inserted the PNG files into the book page, I would send all my widgets to the back of the page so that they were nice and framed by my layout. However, I learned a few things about what I needed to do in Photoshop to make my layout designs work:
  1. Many times, the widgets are not able to be rotated. This threw my normal "off-kilter" style of scrapbooking for a loop. I like things to almost resemble a smash book on some pages, but I couldn't do that if I wanted my widgets to match the holes made for them in my PNG files. 
  2. I couldn't use the gallery widget and keep them behind the PNG files. This would cause a ton of my decorations from my digital scrapbooking to be covered up. I solved this by creating Keynote slideshows of my photos and inserting the keynotes into the page. It's an additional step, but looks much better!
  3. If you want journaling cards behind scrolling widgets, you can set the opacity of the fill to 0% to allow for that to show through. Just be sure to set the line stroke to "no line" so you don't have a weird line around your text!
  4. If you want to have a pop-over text box, you need to have the photo inserted in the page via iBooks Author. This makes design a challenge as you need to make sure the widget from one photo isn't bleeding over into the hole of another widget. Frames became my friend to hide these overlaps!
  5. If you wanted to actually publish your book to iBooks (I didn't want to) you need to keep it below 2G of file size. This is important to keep in mind as you insert videos and media!
Next time on the blog, I'll walk you through my work flow of how I created the book!

Tuesday, March 10, 2015

Disney Scrapbook...electronic version?

We got the amazing opportunity to run the Disney Princess Half Marathon weekend a couple weekends ago. I'm not going to go into a full trip report as you can probably jump on Pinterest or any of the Disney podcasts I referred to last week and get them from there. What I can say is that it was an amazing trip. Most people might be a bit weirded out to have a trip with your in-laws, but my mom, my mother-in-law, my sister-in-law and myself all had a blast! We got to stay in our home DVC resort, the Grand Floridian. The room was spectacular and we loved the hotel amenities. Being able to eat a fantastic dinner right on property the day we arrived was perfect. Plus, we took full advantage of the monorail to get to the races. I definitely think it's the way to go!

All of us were admiring the chocolate sculpture at Narcoosse's

The weekend in the parks was amazing too. I finally figured out the Fastpass + system (it was still in testing phase last time we visited) and we had a great time riding our favorite rides and going to EPCOT at nights before our dining reservations. I got high praise from my family on the dinners. Those ADRs are super important people! 

My little sister-in-law loved sitting next to the fish during dinner at the Coral Reef Restaurant.

The best thing about this weekend was being able to run. I was so careful on this training cycle to make sure I didn't get injured...a feat the ice in Dallas made difficult! But to share a special moment with my in-laws as they crossed the finish line of their first 10K, knowing how hard they trained, was super special. Then, while my mom and I have always shared a special bond, running has taken it to a whole different world. Yet, ever since we both fell in love with racing, we hadn't actually run a race together. Mom is always so much faster than me and I have frequently had Jared to run with on Disney races as we also train together (it's just natural I guess). So this race weekend, I made it a goal to keep up with my mom...and I did! Thank goodness she slowed down (just a little bit!) as we had a really special 13.1 miles to share and encourage each other on. 

Mom and I at the finish of the Half Marathon after receiving our Glass Slipper Challenge Medals!

Ironically, it was racing with my mom that caused me to have my brilliant idea. 

If you travel with me, you are probably going to have to deal with me breaking out the camera and the GoPro. I have made a scrapbook for every year Jared and I have been together. First, I stared cutting out photos and pasting them into a small book with a few paper embellishments. To a certain extent, I enjoy that form of scrapbooking. But then, I was introduced to digital scrapbooking and it has transformed my methods for documenting our memories. I learned how to scan and photoshop and love the layouts I have been able to create. But there were still a couple of hurdles I was working on overcoming. 
  1. These books are expensive! Even with me uploading my layouts and waiting for a Shutterfly sale, these books can get out of my price range. 
  2. All my GoPro videos were having to be incorporated into my layouts via QR codes. Now, I need to have the scrapbook and an iPad to see everything. 
With all the special moments during our vacation, I really wanted to find a way to incorporate EVERYTHING. Mom and I were discussing during the race how much video was now being added to our memory maker packages and not just photos (we had video from rides and animated characters in our magic shots). I was lamenting that I wasn't going to have as many photos and how awesome it would be to incorporate videos on my page. 

Lightbulb moment!

I remembered how in my playbook for the Daily Digi Files (where I get my digital scrapbooking supplies) they have videos incorporated at the end of the book. What if there was a way to make these scrapbooks and just have an iPad to view them?

So, after two weeks of research and work, I have finished my first ever e-scrapbook! It documents all we did over the weekend in almost 40 pages of photos and videos. I have uploaded a sample of it (not the whole book) for you to check out if you would like. It's an iBook file so you will need to have iBooks to check it out. Over the next few blog posts, I'll explain how I created it!