Showing posts with label DIY. Show all posts

Monday, May 9, 2016

Home Makeover: Egli Edition - The Garden!

Jared and I have talked about redoing our garden for a long time now. We finally made it happen on Monday!

The first thing we had to do was change out our sprinkler heads. The old ones wouldn't have cleared the new bed. Plus, these are directional so we won't be watering the fence any more!


Next we built the planter box. Jared made it out of cedar and it smelled incredible! 


Then we dug our trench for the underground hose that would lead from the house to the planter box. We are putting in a subterranean soaker hose to the garden so that even if we are out of town, the plants will still get watered. Once the trench was built, we put the box in place on top of some landscaping netting to keep any future weeds out!


Once that was done we filled in our trench and added dirt! We found a local place that had massive piles of dirt you can buy in bulk instead of the 1 cubic foot bags at Lowes. We got half and half for filler and organic garden dirt for the top. I had some sweet peppers going already along with some jalapeƱos, green bell peppers, strawberries and three kinds of tomatoes. Then, my blueberry came back after dying last year! So I was super excited to put it back in the garden, this time with some more shade. 


One of the most frustrating things last year was that I got one tomato and a bird took a big chunk out of it. So this year, we are adding a cage around the garden to protect it from birds and any other animals that might want to help themselves.

Test fitting the cage


All done!

I'm super excited about my garden and can't wait to see what it can produce this year! I'm getting more and more knowledge about how to grow things and I want it to pay off so bad! I guess we will have to wait a few more months to know!


Saturday, April 18, 2015

#TheHomeImprovementLife: The Big Reveal!

So today is the day...we are finally finished with the guest room makeover! Are you ready for the big reveal???

Here we go!


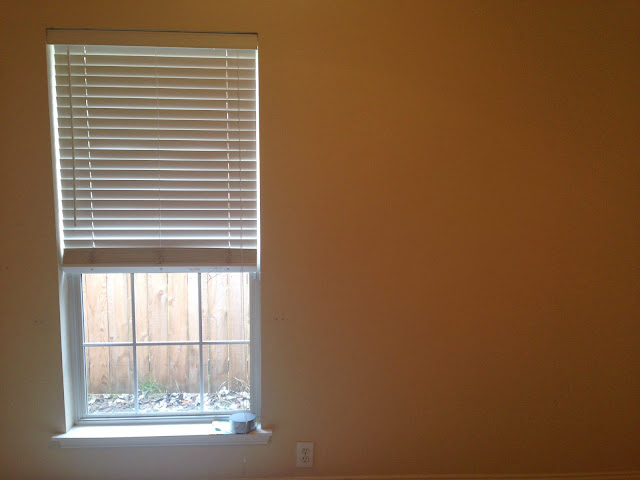
Entering the room before...


...entering the room after!

We went with a Disney infused travel theme...of course! I was inspired by the idea of Beauty and the Beast and inviting our visitors to "Be Our Guest!" As avid lovers of travel, we wanted a place to display our travel souvenirs and inspire our travelers to visit all different parts of the world.

Before


After

We wanted to provide guests a place to put their luggage and a dresser to unpack into so that they don't have to feel like they are living out of their suitcases!

Dresser

The dresser was won at an auction house that is close to where we live for just $35! A simple cleaning and spray painting the handles to match the decor was all we needed to update this piece of furniture!

This mirror was also a consignment sale that we found for $35 as well!

We know wifi is important to everyone these days. So we provide our wifi information right next to sustenance in both healthy and unhealthy forms!
Before
After

We dressed up our window and put up a map on our wall!

Jared found this old map at his parent's house and created a frame for it out of reclaimed wood. We want our guests to come sign the map pointing to where they are from!


We found these oversized drawer pulls on sale for $2.50 each and we spray painted them and repurposed them as curtain holders.
Before

After

Jared also created all the floating shelves for this room. The best part? We have room to grow in displaying our treasures from around the world!

I created this reclaimed wood sign inspired by Beauty and the Beast. As we tell our adventures from traveling around the world, there seems to be common threads that are as old as time. Nothing beats experiencing the world and the experiences shaping our view of life. You can actually buy this sign at our new Etsy store called Loving Life Design Company!

Last but not least, the vision design that I had to inspire this room!

Before
After

Our guests will be luxuriously sleeping on a custom made platform bed that Jared built. Above them, recessed LED reading lights in the shelf will allow them to see even when the main light is off!


Guests will see our photos from around the world (including this landscape of my brother on the Great Wall of China) as they are settling into the room!


This chess set was brought back from Russia by Jared after his family adopted his little brother and sister. It now finally has a place to be displayed!


And finally, what better finish to the travel inspired guest room than a cute vintage globe!

Jared and I sometimes would sit back during a project and wonder why we were doing the guest room before our own master suite. But honestly, we spent a ton of time into this room because we genuinely love people and want them to come visit! So consider this your invitation to come and hang out with us. Just call first!

Here's to new adventures with great friends!

Thursday, April 16, 2015

#TheHomeImprovementLife: Not So Little Projects

We have been diligently working for the past couple of weeks on the little details of the room! From furniture to curtains, it can be deceiving on how "little" these projects might seem. Jared and I have done lots of shopping and changed our minds several times, but we are moving and grooving!


Spray painting our curtain rod system

Jared is blowing off the sawdust from his newly created platform bed!
I spent a good deal of time cutting out the design inspiration piece for this room. It's a surprise!

I can't wait to show you all the final product! It's so close I can taste it!

Saturday, April 4, 2015

Garden Update!

So I'm super excited about my garden! It's been a bit of a learning curve but as spring comes around, we are getting beautiful buds!

The blueberry flowers are beautiful and delicate!
Between the herb garden, the blueberries, strawberries and peppers, we are just waiting for the natural processes to occur...as always! 

Strawberries are on the way!


Herb garden is flourishing!


The sad tomatoes

The one thing I'm sad about is my tomatoes. I tried starting them from seed, but only one hasn't died and it's struggling! I'm hoping it survives the hardening off and maybe we will see it bounce back!

Monday, March 30, 2015

#TheHomeImprovementLife: Paint!

So now that we have all the popcorn off the walls, we now get to the fun part...paint! I have always loved painting, but it's such a small portion of what you actually do when you paint a room. 20% is painting, 80% is prepping the wall to paint!

First thing I had to do is sand down the joint areas on the ceiling and make sure there weren't any rough spots. I bought a handy dandy sanding block that you can put on a stick! Yay for no more reaching on ladders!

Love my new drywall ceiling sander!
Next thing I had to do was prime the ceiling. I have liked Kilz for priming, especially for ceilings. I remember going to a home improvement "expo" and seeing the difference helping the paint job last. Plus it just covers well! 
Add caption
Then, came the hour of removing any grit from drywall and plaster dust and taping the room off. So tedious...but so important! 
All taped off!
Now we get to paint! Again, love my roller on a stick so I can actually reach! 

Painting the ceiling!
I let the ceiling dry overnight and spent the next day taping and painting the rest of the walls!


Cutting in!

You can see how it goes on vs how it dries in this pic!
You can get a lot of really good tips on painting techniques online or even at Home Depot/Lowes. I've been doing it with my mom so long I have developed a method that works for me. Just know that quality of paint does matter in the amount of work you have to do, and be sure to use good natural light so that you can see any spots you miss. This is really important on textured walls like we have!

Monday, March 23, 2015

#TheHomeImprovementLife: Taking Off The Popcorn

So, we talked about project management (booooorring, but necessary). Let's get our hands dirty now!

Here are my before pictures!

As you enter the room
Far side wall

Turning right...

Turning right again...

Turning right again...

So when you scrape popcorn off the ceiling, it's important to note that you don't want to do this yourself is your house is older. I think cerca the 70's but don't quote me on that. Reason is, you may have asbestos in your popcorn ceiling insulation! Bad news! My house was built in the 2000's so I didn't have to worry about that.

Also thing to note is it is SO much easier to do this when you have gotten the popcorn wet first. Cuts down on the dust and makes it come off so much easier! I used an $8.00, one gallon sprayer you would see a pest guy use or to use to spray weeds. Just fill it with water, pump and spray! You will need to also prep your area by taping off the walls and floors and putting plastic to cover everything...this is extremely messy and hard to vacuum up! Finally, grab your ladder and dry wall scraper, along with your goggles and face mask!

Once you have the room prepped, it's really pretty simple. Spray a section at a time (I did approximately 10 ft by 10 ft) and wait for it to soak in (this is important! Gotta let it get all the way through)! Then, climb up on your ladder and start scraping. It's best if you have a 45 degree angle between the scraper and the ceiling.
Half way there!
Notice how I have taped the plastic as high up above the walls as I can!

This room only took an hour to do as it's only 100 square feet, but I can see why many people would want a contractor to come do it. My shoulders were pretty sore after and I was pretty messy! But once we were done we carefully balled all the plaster in the middle of the plastic and threw it away!

Finally done!


Completely covered in plaster


Tomorrow I'm painting the ceiling. Gotta cover up the now bare dry wall! Yay!

Friday, March 20, 2015

#TheHomeImprovementLife: Project Management

Hello again! Hope everyone is doing great. Jared and I had a great weekend where we went to Houston for some work training for me and time with family. One thing we realized while down there, is we are going to have a ton of guest coming to our house soon...and no place for them to sleep! We decided then to take a small amount of the bonus that Jared got from work last year and use it to remodel our guest room so we can host our guests comfortably!

So, I'm weird. And between me and Jared, we communicate weird on projects. I like writing things out so that I can realistically see how things can be done. Jared likes to see my designs on paper so he understands what I'm wanting (smart man)! So, what I wanted to share on the blog today is how I make a project management spreadsheet. My hope is it helps you plan your next home improvement project!

First, I draw out what I want things to look like. Then, from those drawings, I write down all the projects that I see in my drawing and list them in the spreadsheet. I like to use Google Docs so that Jared and see the spreadsheet too.


From there, I make a tab for each of the projects:

After I select the tab and write down the steps I would need to do to complete each project, and approximate the amount of time each needs to take. I don't try to be exact, but to just have a realistic expectation that things might take longer than I'd like.


Then I have the spreadsheet link each of these total times to the first tab with my list of all projects. I then assign a priority to each project, keeping in mind that if I start one project (like the curtains) getting the curtain rods and curtain holders would be the same priority.


Then we sort by priority and longest amount of hours and we now have a great visual on which projects we should start first!

Jared is on the project of building the platform bed and I'm on painting the room. Next time, I'll show you how we de-popcorned the ceiling!